In modern web development, building a secure authentication system is crucial for protecting user data and ensuring the integrity of your application. In this article, we will explore how to implement secure user authentication using JSON Web Tokens (JWT), GraphQL, Express.js, and MongoDB. We’ll guide you through setting up the environment, connecting to MongoDB, creating a MongoDB schema, and implementing a GraphQL server with robust authentication mechanisms.
Introduction to GraphQL
GraphQL is a query language for APIs and a runtime environment for executing those queries with existing data. It allows clients to request only the data they need and provides a more efficient and flexible alternative to traditional REST APIs. With GraphQL, you can define a schema that represents your data and allows clients to query and mutate that data.
Setting Up the Environment
Before we dive into the implementation details, let’s set up the project environment. Ensure you have Node.js and npm installed on your machine. Create a new project directory and initialize it with npm.
mkdir graphql-auth-example cd graphql-auth-example npm init -yNext, install the required packages:
npm install express jsonwebtoken bcrypt mongoose apollo-serverConnecting to MongoDB
We’ll use MongoDB as our database, and Mongoose as the ODM (Object Document Mapper) to interact with MongoDB. Replace the MongoDB connection string in the code with your own database details.
// MongoDB Connection const mongoose = require('mongoose'); mongoose.connect('mongodb://127.0.0.1:27025/db_egwja');MongoDB Schema
Now, let’s define the MongoDB schema for our User model. This schema defines the structure of the documents stored in the users collection.
// MongoDB Schema
const userSchemaMongo = new mongoose.Schema({
    name: { type: String, require: true },
    email: { type: String, index: true, unique: true },
    roles: [String],
    password: { type: String, require: true },
    created: { type: Date, default: new Date() },
});

userSchemaMongo.set('toObject', { virtuals: true });
userSchemaMongo.set('toJSON', { virtuals: true });
userSchemaMongo.virtual('id').get(function() {
    return this._id.toHexString();
});

const DbUser = mongoose.model('User', userSchemaMongo);
This schema defines the following fields:
name: The name of the user.email: The email address of the user, with indexing for faster queries and ensuring uniqueness.roles: An array of roles assigned to the user.password: The hashed password of the user.created: The timestamp indicates when the user account was created.
User Authentication Functions
Now, let’s delve into the provided user authentication functions. These functions handle various aspects of user authentication.
createNewUser(user)
This function takes a user object as a parameter and creates a new user in the MongoDB database. It utilizes bcrypt to hash the user’s password before storing it.
const SALT_ROUNDS = 12;
let createNewUser = async (user) => {
    if(!user) return false;
    try{
        user['password'] = await bcrypt.hash(user['password'], SALT_ROUNDS);
        let data = await DbUser.create(user);
        return data;
    } catch(err) {
       return false;
    }
}
loginUser(user)
This function handles user login by verifying the provided credentials against the stored hashed password. If the credentials are valid, it returns a user token using JSON Web Tokens (JWT).
const JWT_SECRET = 'just-a-secret';
let loginUser = async (user) => {
    if(!user) return false;
    try{
       let db_user = await DbUser.findOne({ email: user.email });
       if(!db_user) return false;
       if(!await bcrypt.compare(user.password, db_user['password'])) return false;
       return {
        id: db_user.id,
        token: jwt.sign({id:db_user.id, email: db_user.email, name: db_user.name}, JWT_SECRET)
       };
    } catch(err) {
       return false;
    }
}
verifyJWT(token)
This function verifies a JWT token, ensuring its integrity and extracting the authentication data.
let verifyJWT = async (token) => {
    try{
        let authData = jwt.verify(token.split(' ')[1], JWT_SECRET);
        return authData;
    } catch(err) {
        return false;
    }
changePassword(id, credentials)
This function allows a user to change their password. It first verifies the old password and then updates the password with the new hashed one.
let changePassword = async (id, credentials) => {
    try{
        let db_user = await DbUser.findById(id);
        if(!db_user) return false;

        if(!await bcrypt.compare(credentials.old_password, db_user['password'])) return false;

        db_user['password'] = await bcrypt.hash(credentials.new_password, SALT_ROUNDS);
        let data = await DbUser.findByIdAndUpdate(db_user._id, db_user, {new: true});
        return data;
    } catch(err) {
       return false;
    }
}
getUserDetails(id)
This function fetches user details based on the provided user ID.
let getUserDetails = async (id) => {
    try{
        let db_user = await DbUser.findById(id);
        if(!db_user) return false;
        return db_user;
    } catch(err) {
       return false;
    }
}
GraphQL Setup
We will Integrate GraphQL into the Express.js application using Apollo Server. This is the definition of the GraphQL schema and resolvers.
// GraphQL Section
const { ApolloServer, gql } = require('apollo-server');
const { GraphQLError } = require('graphql');

// GraphQL Schema
const typeDefs = gql`
    type User {
        id: String,
        name: String
        email: String
        roles: [String]
        created: String
    }

    type UserToken {
        id: String,
        token: String
    }

    input UserCreateInput {
        name: String!
        email: String!
        roles: [String]!
        password: String!
    }

    input UserLoginInput {
        email: String!
        password: String!
    }

    input UserChangePasswordInput {
        old_password: String!
        new_password: String!
    }

    type Mutation {
        createUser(user: UserCreateInput): User
        loginUser(user: UserLoginInput): UserToken
        changePassword(credentials: UserChangePasswordInput): User
    }

    type Query {
        getAuthUser: User
    }
`;
Now, let’s dive into the explanations for each type defined inside the typeDefs.
- User Type:
- Represents the structure of a user.
- Fields:
id: String – The unique identifier of the user.name: String – The name of the user.email: String – The email address of the user.roles: [String] – An array of roles assigned to the user.created: String – The timestamp indicating when the user account was created.
- UserToken Type:
- Represents the structure of the authentication token issued upon successful login.
- Fields:
id: String – The unique identifier of the user.token: String – The JSON Web Token (JWT) used for authentication.
- UserCreateInput Input Type:
- Input type used for creating a new user.
- Fields:
name: String! – The name of the user (required).email: String! – The email address of the user (required).roles: [String]! – An array of roles assigned to the user (required).password: String! – The user’s password (required).
- UserLoginInput Input Type:
- Input type used for user login.
- Fields:
email: String! – The email address of the user (required).password: String! – The user’s password (required).
- UserChangePasswordInput Input Type:
- Input type used for changing the user’s password.
- Fields:
old_password: String! – The user’s current password (required).new_password: String! – The new password to set (required).
- Mutation Type:
- Represents the set of operations that modify data. In this case, it includes mutations for creating a user, logging in, and changing the password.
- Mutations:
createUser(user: UserCreateInput): User– Creates a new user and returns the user object.loginUser(user: UserLoginInput): UserToken– Logs in a user and returns the user token.changePassword(credentials: UserChangePasswordInput): User– Changes the user’s password and returns the updated user object.
- Query Type:
- Represents the set of operations that query data. In this case, it includes a query for fetching details of an authenticated user.
- Query:
getAuthUser: User– Fetches details of the authenticated user.
These type definitions define the structure of the data and operations available in your GraphQL API. The types map directly to your MongoDB data model and provide a clear contract for clients interacting with your server.
Constants
Now, let’s include the remaining constant variables for the application used in the code. You should move these to the top of the code:
// Constants
const port = 3000;
const SALT_ROUNDS = 12;
const JWT_SECRET = 'just-a-secret';
These constants include:
port: The port on which the Express.js server will run.SALT_ROUNDS: The number of salt rounds used for password hashing.JWT_SECRET: The secret key used for signing JWT tokens.
Running the Server
Start your GraphQL server by running:
node app.js
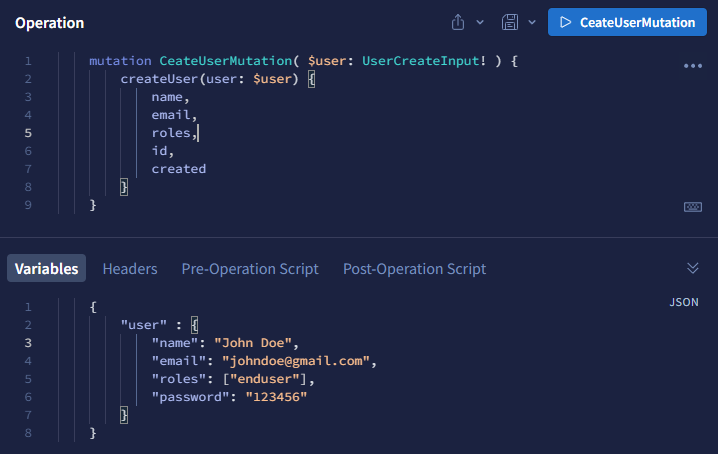
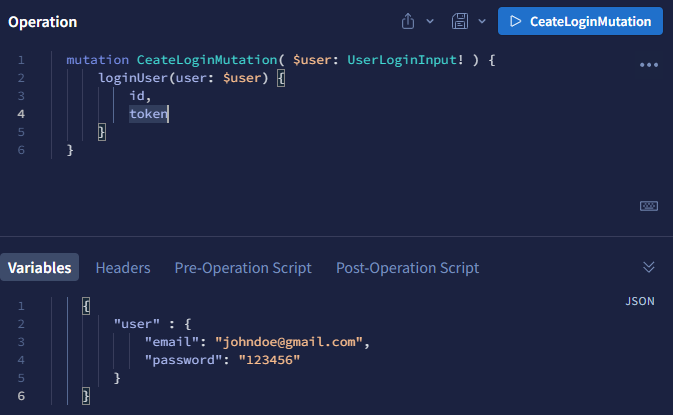
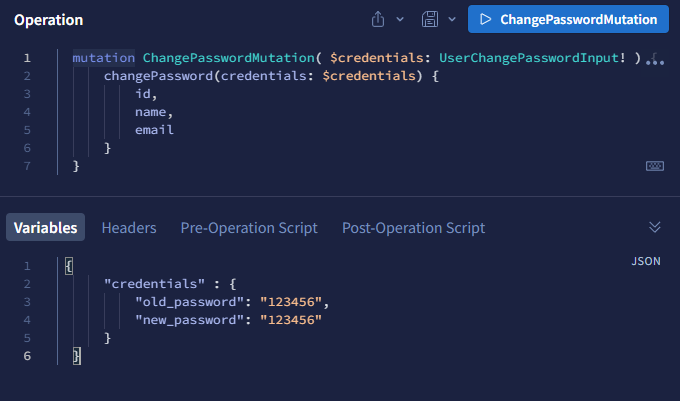
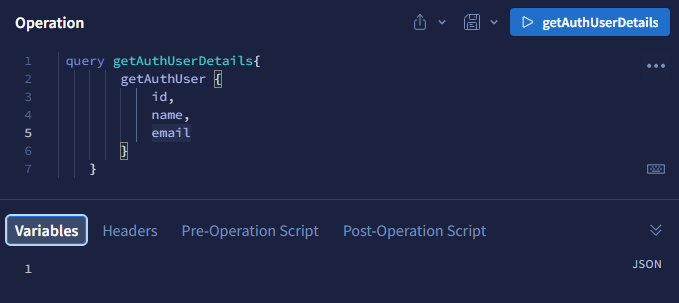
Your GraphQL server will be accessible at http://localhost:5000. Use tools like GraphQL Playground or Insomnia to test various operations, including creating a new user, logging in, fetching user details, and changing passwords.
GraphQL Playground
We have done all the coding part of our sample project. Now it’s time to test the functionalities using the GraphQL Playground tool. Note. you must turn off the GUI playground tool on your production for security reasons.
Creating a new user

Let’s login

Let’s change the new user’s password


Get logged user’s details


Conclusion
In this article, we’ve covered implementing a secure authentication system using GraphQL, Express.js, and MongoDB. We emphasized good practices like password hashing, JWT token generation, and authorization checks. You can build upon this foundation to add features like user role management, email verification, and more. Always prioritize the security of your authentication system to safeguard user information and maintain the trust of your application’s users. For easy demonstration, we created a single javascript file for the application. But you can module core functionalities by separating codes into multiple files like MVC structure.
Checkout GitHub Repo

